YT-1000 ramp

YT-1000 ramp

Wednesday 10 October 2018

3D Printed Lunar Vehicle

Several months ago I purchased a Prusa MK3 3D printer with the intention of using it to supplement my model building. Sometimes there are parts that are just too complicated or time consuming to build the old fashioned way. But then I thought of trying something new, why not print the whole model? I've been using 3D printing for a few years now so I have some experience with the technology. With that I decided to model something along the lines of this: 

I only know how to use Tinkercad but I find it does just what I need. It took me a couple months of designing, printing, re-designing and re-printing. Sometimes I would spend hours designing some part only to decide not to use it and go in totally different direction. But that was part of the experience, if I had done this the old way I would have spent weeks or months building something out of styrene, and wasted all that time. In Tinkercad I can try things, add parts and shapes or remove them to see how it looks before printing. I don't have any design training so for me it's trial and error. I used PLA filament, painted the parts with Dulpi-Color Automotive Primer Filler then sanded between coats until I was happy with the surface finish.


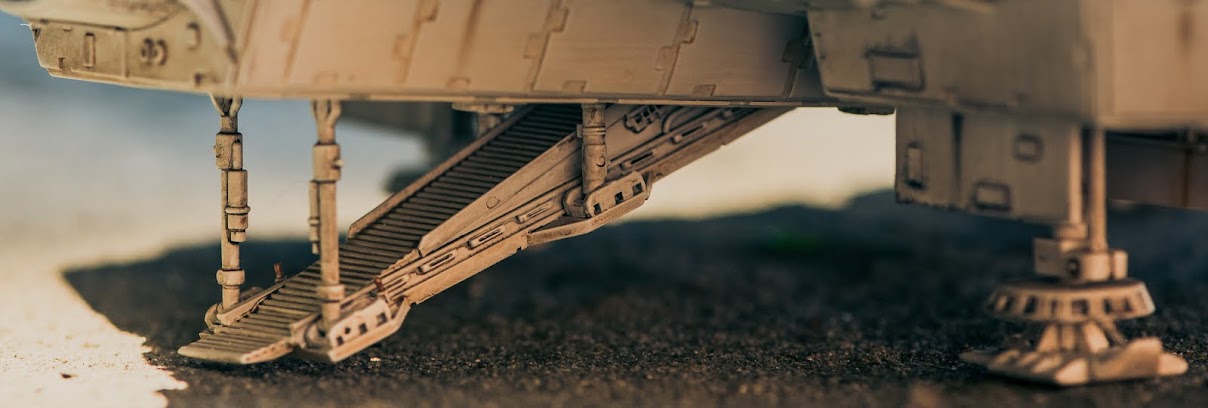
Weathering was done with Dark Slate Grey powder pigment, it was just brushed on then a clear coat was added. Which caused a major disaster. The clear coat etched the styrene windows causing them to be permanently frosted. So now you can't see the interior. I'm gonna try to remove the windows and install new ones. Some airbrushing was also done to dirty up the lower surfaces.


Thursday 12 April 2018

Star Wars U Wing part 4

So as predicted in my last post I had to rip my model apart, well not all of it. After gluing the upper and lower sections together I found that the lower front was not centred, 4mm out might as well be 10mm. So I carefully cut it out and made a new one, seen here with the old behind.


The new one is much better.


A rubber mold was made of the engine and many casts poured. I have a bunch of resin to use up so I now have engines for future projects.

 I wasn't happy with the PLA 3D printed afterburner, mostly because I could not glue greebles to it. So I went old school and turned a new one on my lathe from acrylic rod. The end parts are 3D prints that I designed, those will be ok. 

Styrene and acrylic being a similar material makes gluing parts together with the same solvent easy.


The engine mounts and intake vents were also molded and cast.
I had to securely attach the engines, which are a bit heavy, to the mounts. These screws will fit into holes in the now hollow engines (because I drilled them out on a drill press)
You can see the ends of the screws in the engine.


Using some wood blocks, tongue depressors and rubber bands I lined up the two engines with the mount.

Then held in a vice so I could dribble some 5 minute epoxy over the wood screws. This held them in place quite well.


I had to build this jig to ensure the afterburners were perfectly aligned and centred with the engines.


Some greebles were added to finish off the front grill.


As you can see the engines and a few other parts were pre-painted. I used acrylic paints and then a method of wetting a section of the model with odourless paint thinner, then adding small dabs of artists oils and then brushed to blend. A bit tricky to explain but there are some videos online that explain various methods. After that it's a matter of assembly. 

And the finished model.


Sunday 25 February 2018

Star Wars U Wing part 3

After taking a break from modelling to enjoy the summer and do some home renovation, I'm back to this project. It's gotten quite exciting as now the larger parts are coming together and details are being hashed out. The upper and lower parts of the cockpit section are mostly done. The upper part is glued to the wing section and I'm getting the lower section ready. It's always a stressful time at this stage because if you forget some key part you risk damaging the model if you have to rip it apart. 

So onto the engines, after some careful measuring and looking at reference images I went with a piece of 1.25 inch PVC pipe.


PVC pipe marked out and holes drilled to hold the Epoxy putty.
An inner sleeve was added to keep the putty from leaking into the pipe.
I used Fix-it-Stick as it sets fast and rock hard.


Into the lathe to remove the excess putty and begin shaping. 


A layer of .5mm styrene was glued (using spray adhesive) to the exposed PVC part. This was done so I had something to glue the detail parts too. PVC and Styrene are not compatible with the solvent glue I use (methylene chloride). The black intake part is a found item, not sure what it was but I like it.


I'm using what ever reference I can find online and in books but I find they are not consistent. Probably because the talented artists that are making these images are also finding limited reference for every little detail. So I'm using what details I like and making some up. I'm not a purist when it comes to these things and it gives me a chance to put my personal stamp on my models.


Here is the Reactor core section being scratch built from my collection of greebles. Again following the general design but putting my own spin on it.

The engine I built earlier is temporarily held in place on the 3D printed mount. I've added greebles to it as well.

Click here to go to part 4

Wednesday 3 January 2018

Some Bandai modeling

Just a couple models I picked up to try. The Bandai models are pretty easy to assemble and fit together very well. The parts are super clean and just snap together. I've done some weathering to this AT-ST model. It's been a while since I've built anything so I wanted something simple to do.


Also built a Y-wing but haven't done any weathering to it yet. It's 1/72 scale so it's pretty small, only 9 inches long.


If you're looking to add some models to your shelf without all the mess of glue and paint, then these are perfect.